Exploring Science through commonly available materials
A good teaching-learning practice involves conducting interesting activities that bring scientific phenomena into the classroom and enable children to see science in action, writes H R Madhusudhan, in Learning Curve.
“If science is poorly taught and badly learnt, it is little more than burdening the mind with dead information and it could degenerate even into a new superstition”
The quote above was a favourite one of one of my teachers, Dr. T K Jayalakshmi, who taught us Educational Psychology and Methods of Teaching Mathematics at R V Teachers’ College.
Somehow, the impact of this quote on me persists even to this day. But what I have not been able to understand are the meanings of ‘poorly taught’ and ‘badly learnt’!
I suppose, as classroom teachers we have a sense of what they mean.
A good teaching-learning practice involves conducting interesting activities that bring scientific phenomena into the classroom and enable children to SEE science in action.
One does not need sophistication of a formal laboratory for this. Commonly available materials, a mindset to think ‘out-of-the-box’ and a curiosity to adapt those materials to demonstrate scientific concepts are all that are needed.
We have mentioned a few examples of this approach.
Chalk: We know that chalk is a porous object. It is often used as an ink-blotter. The same property can be used to demonstrate chromatography, a fundamental principle of separation of mixtures –, an important method to separate components of a certain type of mixture.
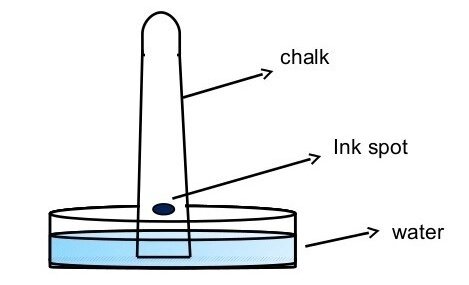
Add a drop of black sketch pen ink along a thin groove made parallel to the base of the chalk. Stand the chalk in a plate containing a small amount of water. Make sure that the level of water is below the groove. After a few minutes, different colours appear at different heights from the groove! Black ink is composed of a mixture of different pigments. The mixture in a solvent gives the perception of black! In fact, there is no single pigment that give out ‘black colour’ (Why?). This is a big, counterintuitive idea.
Let us continue with the chromatograph experiment. An experiment or a demonstration without questions or discussion of the observed result or phenomena is totally useless, misplaced and a great distractor to learning. So, here are a few sample questions related to this experiment: why do pigments separate out at all? And why at different heights? What is the force that ‘carries’ the pigments against gravity? Do black inks manufactured by different brands have same colours mixed in them? Are inks of different colours also formed by a mixture of pigment of different colours? Is a dustless chalk better that the ordinary chalk for this experiment?
Mahogany Pod: Mahogany is a common tree, especially in Bengaluru. While it is a popular choice in furniture-making, its pod can be a teachers’ delight. What can be taught using it? Well, it can be a TLM for many a concept across various subjects and topics.

Mahogany pods are found packed in a shell. As summer approaches, the shell cover loses water content, dries up and develops cracks on its surface. And at some point the shell breaks open showering down the pods packed inside. The shower itself is a treat to watch.
Each shell has more than thirty pods. The first question that one can ask (it is fine even if the answer is not immediately forthcoming) is the packing fraction of each shell – what percent of the volume of the shell is occupied by the pods. It will be an interesting and open-ended exercise for children to answer this question. Next, is the packing fraction nearly the same in all shells?
Can we ‘suggest’ a better way to pack more pods within the same volume without altering the pods’ behaviour? The behaviour is this: as the pods fall freely, they begin to rotate after falling a certain distance!
Why do they rotate? Is the direction of rotation of a single pod always the same – one can drop a pod repeatedly to answer this question. Do all the pods in a given shell demonstrate the same sense of rotation?
If not, if the direction of rotation – clockwise and anti-clockwise – equally distributed over a large number of pods? If the direction of rotation is biased, why is it so? What has the structure of the pod to do with this unusual rotational behaviour? How is the rotational behaviour affected if we progressively chopped the pod – a small portion at a time?
Suppose we time the fall of a hundred different pods from the same height – would they all have the same ‘Time of flight’ that is, they stay in the air for the same duration? Is the time of flight affected by the mass of the pod? Can we establish an empirical relation between mass and ‘time of flight’?
If the ‘time of flight’ differs, what are the factors that affect it? Among these factors, which are the dominant ones? All the questions listed so far are the kind of questions a teacher of physics/mathematics would be interested in.
However, a biology teacher may want to ask ‘Why did the mahogany pod evolve this behaviour? What is the survival advantage of such a behaviour? And, why should the Mahogany tree invest so heavily by way of producing large number of pods?
After all, pod production consumes enormous amount of energy. Actually, mahogany pods are dispersed by wind. Suddenly we ‘see’ the tree’s rationale behind this behaviour. For a survival advantage, the ‘time of flight’ has to be maximised.
This is where rotation is important. Much of the gravitational potential energy translates into kinetic energy of rotation leaving behind a smaller ‘kinetic energy for translation’!
This will ensure that all the pods don’t fall in a heap and compete with one another for the same, limited resources for their growth and development. This is nature’s way of keeping away sibling rivalry’ among the pods! Actually there are different species of mahogany in which the pods are designed differently with the function being the same!
Now, one can revisit all the questions raised above and compare the results across different species. A teacher needs to put a little effort in collecting these varieties during January to March or so.
It is very easy to collect several hundreds of these pods. It is highly instructional to challenge children to simulate the behaviour of falling Mahogany pods using paper models. Now, they have complete control over the shape and size and mass of the paper ‘pod’.
In this one set of activities, we can take a child through the methods of science and scientists – to observe, to measure, to gather data, plot graphs to establish relations among various parameters, to have hypotheses, test the hypotheses through models…. Several more can be added to this suggested partial list of questions appropriate for primary through to high school.
One can use the falling pod to teach conservation of energy. At a slightly higher level, or for highly motivated and ambitious children, higher order questions can be raised such as: what makes the pod rotate? Rotation requires torque and how does it arise in this case? How does the speed of the falling pod vary with distance covered? Observe the similarities and differences in the variation of speed of the pod when dropped from different heights. Is this a case of accelerated motion? What are the forces acting on the pod?
So we see that a mahogany pod falling under gravity is potentially a ‘material’ that provides rich learning experience covering several concepts in mechanics. One can ask different questions appropriate to the concept being discussed in the class or the study itself can be a project-oriented learning after all the relevant concepts have been discussed.
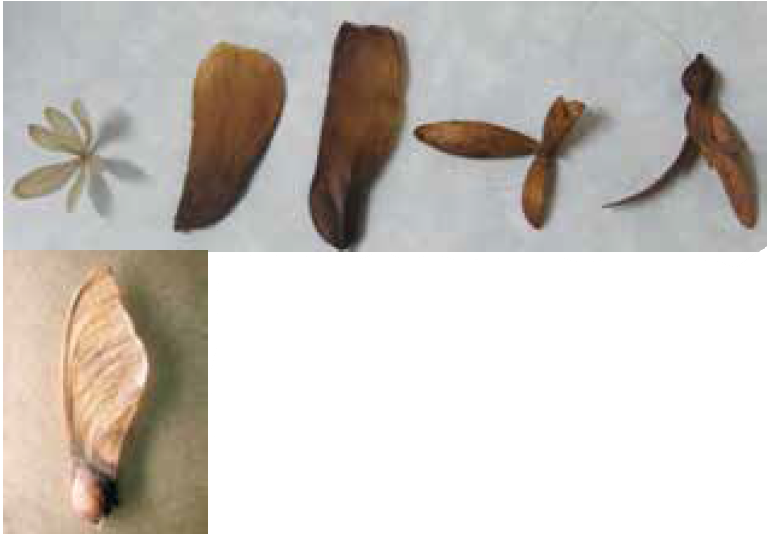
Nature is an imaginative designer — different designs with one function
Are there pods designed differently that rotate as they fall?
Well, evolution has brought about several designs for the same behaviour and function. It will be interesting for children to explore those as well.
My next prop that is commonly available and which can be used a TLM is a metre ruler – yes, a ruler or a scale! A teacher in a classroom normally uses a ruler either to draw lines in a geometry class or as an instrument of threat to maintain ‘order’ in an unruly class.
The effect of a ruler, however, transcends these traditional uses. Several concepts can be demonstrated with a ruler. We will discuss just a few of those and leave the rest to the creativity of teachers.
- Press the ruler down firmly on a table surface as shown in the photograph. Gently pull the ‘free end’ of the scale down and release.
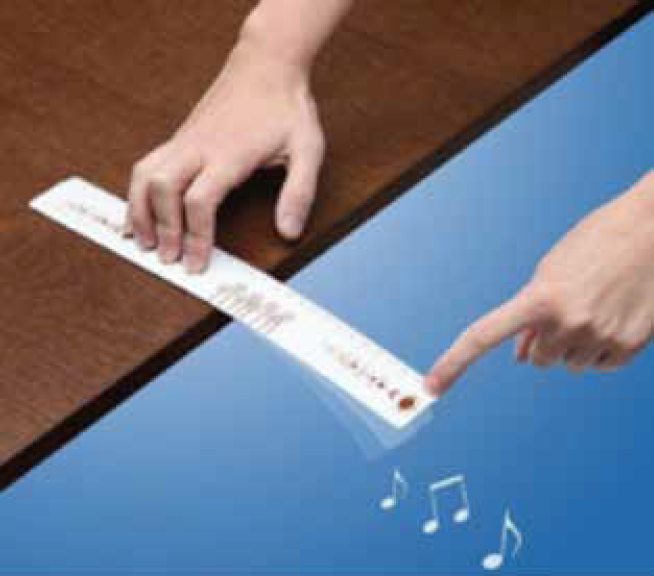
The free end of the scale now oscillates. Now, children can ask and explore several questions such as: Is the ratio of number of oscillations to the time taken to execute that, a constant?
Does the ratio depend upon how much the free end is pulled down before releasing? How does the ratio change the fixed edge of the scale is scale at 5 cm mark, 15 cm mark, 25 cm mark and so on?
Repeat the above experiments by placing a small weight, say a lump of plasticine clay at the free end. How does the ratio compare now? How does the ratio change if the lump of clay is stuck at different distances from the free end?
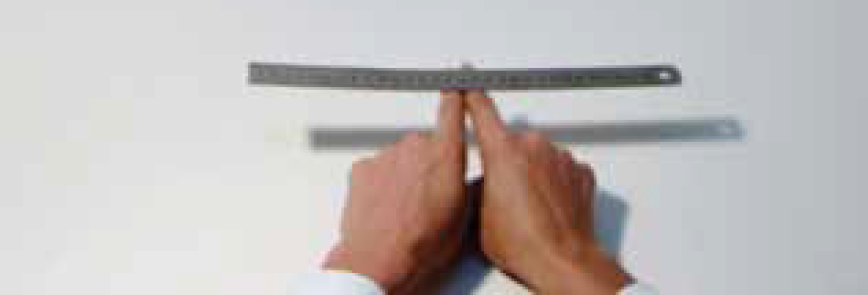
2. Support the two ends of the metre scale on stretched forefingers, as shown in the figure. Try moving the two fingers simultaneously and towards each other – towards the middle of the scale.
Children will find that it is impossible to move (slide) the two fingers at the same time! Only one of the fingers moves for some distance before it stops and the other finger begins to move now.
Now to the questions: Why can one not move both fingers simultaneously all the time? Why use fingers alternately? What pattern do we notice in the switching distances? Where do the fingers finally meet?
Where would the fingers meet if a small lump of clay is placed on the scale at 10 cm mark? 20 cm mark? What is the role of friction in this experiment? What would the experimental results be if the fingers were oily? What if fingers are replaced by pencils?
The experiment mentioned above teaches several interesting ideas related to static and kinetic friction, centre of mass and torque.
A rubber balloon is another useful material. One of the experiments that textbooks often describe to demonstrate that air has weight is shown here.
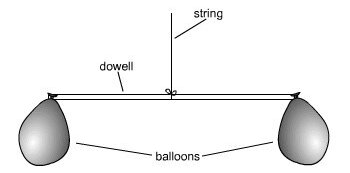
The stick is shown to be balanced when both balloons are deflated or when equally inflated. The end of the weighing scale that carries balloon that is inflated more tilts down. This experiment supposedly demonstrates that air has weight.
The teacher can now ask the children to repeat the experiment with water in place of air – water-filled balloon submerged in a tank of water. Would the water-filled balloon tilt the weighing scale at its end? In other words, does this experiment demonstrate that ‘water has weight’?
Experiments cannot be wrong. Our interpretations of the observed behaviour can be wrong! We have deliberately not answered the question raised above. This activity also shows how science is, sometimes, taught ‘badly’ and learnt ‘poorly’.
These days powerful neodymium and ceramic magnets are easily available and are not expensive. Treat them NOT as magnets alone but as agencies of force. This orientation opens up avenues to use them to demonstrate and teach a number of concepts in mechanics. We will list, as usual, a couple of those.
- Take a lightweight toy cart. Stick one of the magnets on top of the toy using cellophane tape. Bring another magnet near the magnet on the toy. The toy accelerates- force brings about acceleration.
Next, stick the second magnet a couple of millimetres away from the first, using cellophane tape. Does the cart move now? This is perhaps the most instructional demo on Newton’s third law of motion.
Students’ free body diagrams of the set up sometimes show the action-reaction pair acting on the same body! This demo clearly shows the result of action and reaction acting on the same object. - What does a weighing machine measure? Some relevant discussion by the teacher in the classroom is a must, in order to appreciate this question followed by the activity suggested here.
Ceramic magnets that have a hole in the middle (‘doughnut shaped’ as they are called) are slipped through a stick as shown in the photograph. Check the reading on the weighing scale.
Would the weighing scale register the same weight if the magnets are in repulsive mode? Perform the experiment after the children have answered this question. The teacher has to moderate a discussion before and after the second part of the experiment. This activity actually tells them what exactly a weighing machine measures!

What would the weighing machine register in each of these cases with same magnets?
Profound ideas such as these can be discussed and demonstrated using commonly available materials. As classroom teachers we must develop a habit of learning the properties and uses of things that we use.
That will help in developing activities/experiments using those materials. Plastic bottles and pipes, PVC pipes, syringes, toys, packaging materials like thermocol and bubble wraps, aluminium foil used for food packaging, and so on.
One has to prepare a list of such materials along with their properties. Of course, looking at the primary application we can infer at least a couple of properties such as thermal conductivity, density, transparency. It takes time for one to shape one’s thinking along these lines. It is worth the time spent, though. More importantly, we would not be letting science degenerate into ‘new superstition’!
About the author:
H R Madhusudan has been working at Jawaharlal Nehru Planetarium, Bengaluru, since 1995. He is involved in conducting, coordinating, and teaching all the educational and science popularisation programmes of the planetarium.
He may be contacted at pallavimadhusudan@yahoo.co.in