How to teach children to apply science to explore natural phenomena
Kavita Krishna, in i wonder magazine, explains how diverse activities in the local environment give children the chance to engage in practical action by exploring the theme of water in a school located in a drought-prone district of Andhra Pradesh.
‘Water’ as a theme offers many opportunities to learn basic science concepts, and study natural phenomena. But how do we help children connect this theme with personal experiences and pressing environmental issues? This article describes an attempt to do this in a rural middle-school classroom.
Teaching science to energetic 11- and 12-year-olds presents teachers with both a challenge and an opportunity.
The syllabus1 may tell us what they should learn, but how do we bring it to life? How do we teach children to apply science to explore natural phenomena? How do we help them connect a topic in the textbook with their local environment?
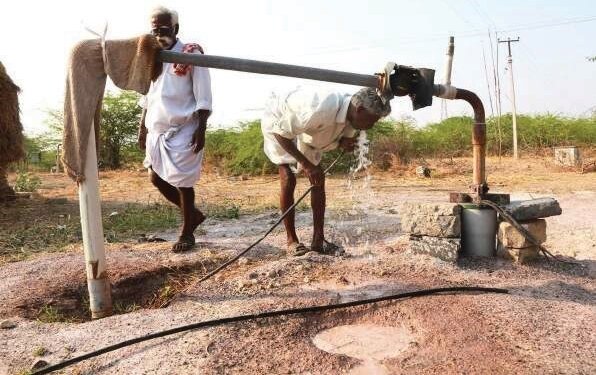
Memories of water
Credits: Rahul M. and Sahith M, People’s Archive of Rural India.
URL: https://ruralindiaonline.org/en/articles/memories-of-water/
License: CC-BY-NC-ND.
These questions underpinned my approach (see Unit Plan Sheet) to exploring the theme of ‘water’ over a period of five weeks in a school located in a drought-prone district of Andhra Pradesh.
My students came from the surrounding villages and hamlets. Their parents were marginal farmers, pastoralists, or ran small rural businesses. Most of these children were the first generation to have progressed to middle school in their communities.
Like many rural areas in India, these local communities had an intimate knowledge of their natural environment coupled with low levels of formal science education.
Learning in the classroom
I began by reviewing water-related concepts that students had learnt earlier. For example, my students had studied about mixtures and solutions, and investigated the solubility of different substances in earlier lessons.
They had also used different methods to separate water from mixtures, and learnt about capillary action. In addition, they had learnt about the three states of matter (solid, liquid and gas), and had observed transpiration in plants (see Fig. 1).
A review of what they already knew provided a good starting point for studying the water cycle and water quality.
We explored the water cycle through classroom discussions and demonstrations. Learning about precipitation, evaporation, transpiration, and percolation led to a discussion on how water constantly changes its ‘state’ and moves around the planet.
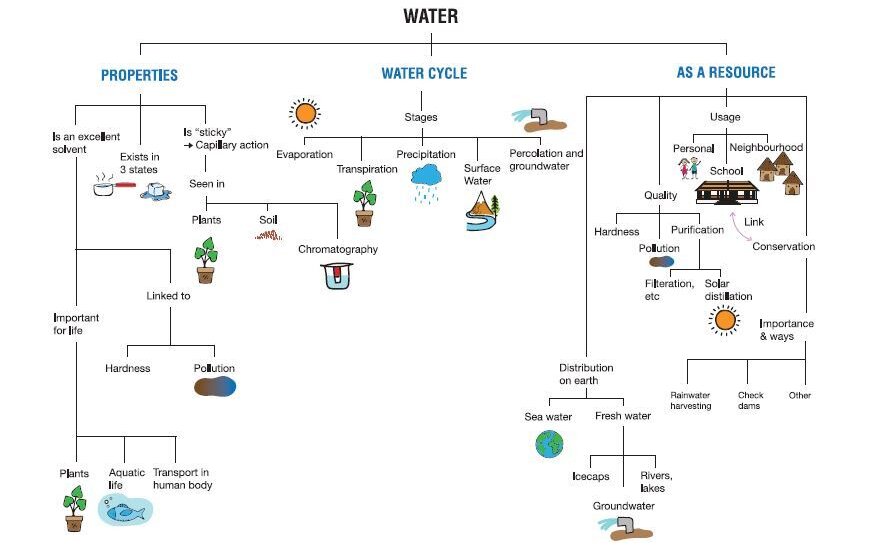
Fig.1. A concept map for ‘water’. A concept map can help a teacher see connections in the curriculum. It can also assist with planning lessons around a theme. This concept map for water helped plan this unit.
Credits: Kavita Krishna. License: CC-BY-NC.
The concept of percolation then led to a discussion on groundwater — the main source of water in the region. Students were aware of how local communities and livelihoods were stressed by falling groundwater levels.
I used a simple model to demonstrate how water percolates through the soil, collects in aquifers, and is pumped out of borewells (see Box 1).
This sparked off a lively discussion on groundwater, with students raising questions like: “Why do we find groundwater only in some places and not in others? Does a water diviner know where to find water? How deep does the water flow underground — is it like an ocean underneath? Why do we have to dig deeper to find water in borewells each year?”
Another familiar and relevant aspect that we discussed was water quality. Most of my students had heard their elders referring to the increasing levels of ‘salt’ in water. They had also observed white deposits on vessels used to boil water.
They could now understand that the water from borewells was a mixture of several substances. A demonstration to show that soap lathered more with distilled water (soft water) than with borewell water (hard water) led to a discussion on water hardness.
We constructed a simple solar water distiller to observe how salts and other impurities could be separated from water.
Some students also raised questions related to water ‘ownership’ and rights, like: “If our neighbour pumps too much water from his borewell, will ours dry up? How can we share groundwater fairly?”
This led to discussions about how water was used in each of their villages, as well as community management and conservation of water sources.

Box 1. Making a simple groundwater model:
A simple model can be used to explain the source of groundwater and how it collects in the aquifer. This model can be used to demonstrate how borewells draw water from the aquifer, and that groundwater is a shared resource.
It can also be used to show how pollutants contaminate aquifers, and discuss ways to conserve and recharge groundwater.
You will need
- A large beaker (at least 1 litre capacity) or a large transparent container
- Two small containers
- Long dropper
- Gravel (small stones), sand and topsoil or mud
- Coloured ink
- Water
How to build the model
- Take the large transparent container and put a layer of gravel about 7 – 8 cm deep at the bottom.
- Pour some water over the gravel till its level is about 2 cm from the base of the container. This represents groundwater.
- Put the long dropper or straw into the gravel with its opening submerged in the water.
- Pour a layer of sand over the gravel layer to about 4 cm depth. Make sure that the dropper stays vertical.
- Add a layer of topsoil over the layer of sand to about 2 cm thickness.
- In this model, the water and stones in the lowest layer represent the aquifer. The sand and soil represent the upper layers of soil through which the water percolates. The dropper represents a borewell. The base of the container and the table on which the container stands represent the bedrock.
- Keep a small container of plain water ready. This will be used to represent surface water from rain.
- Add a few drops of ink to another small container of water. Keep this coloured water ready. This will be used to represent pollutants.
Explaining what an aquifer is
This step involves pointing out the different layers of soil in the model and explaining what each part of the model represents (students may be familiar with this if they have studied about soil). For example, in the model:
- The top layer represents the topsoil. This is the fertile layer in which you see grass and small plants growing.
- The layers of small rocks and sand in the model represent the permeable layers of weathered rock under the topsoil. The roots of big trees may reach these layers. These layers have spaces that can hold the rainwater as it percolates through them. The body of water held in this layer of soil and rock is called an aquifer. This is where we extract our groundwater from.
- The base of the container represents the bedrock, which is an impermeable layer of rock. Water cannot percolate through the bedrock.
- The dropper represents a borewell.
Demonstrating how groundwater is extracted from a borewell
Use a dropper to draw out some water. When you pump water out of a borewell, you are extracting groundwater from the aquifer.
Demonstrating how aquifers are recharged by surface water
- Demonstrate how groundwater is recharged. Gently pour some clear water from the beaker onto the top layer in the model without disturbing the layer. Let students observe how the water level in the aquifer goes up as the water percolates down.
- Discuss how rainwater soaks through the layers of soil and reaches the aquifer. This is called recharge. It can take time for the water to percolate and for the level in the aquifer to increase. The aquifer can also get recharged from water seeping in from streams, rivers, and tanks in the area.
Demonstrating contamination of the aquifer
- Demonstrate how pollutants can contaminate the aquifer. The coloured water represents pollutants like industrial effluents or pesticides. Pour some of the coloured water onto the surface without disturbing the soil. Wait for the coloured water to percolate into the aquifer (in the model) and draw students’ attention to how the colour of water in the aquifer changes.
- Explain how pollutants on the surface can percolate into the groundwater and contaminate it. Pollutants can include effluents from factories, pesticides and fertilisers used on farms, and sewage from homes.
Questions for discussion
- Why do borewells go dry?
- Is groundwater a limited or unlimited resource? Why?
- How can we help to recharge the aquifer? Do you know of any attempts to recharge the aquifer in your neighbourhood?
- How can we conserve and manage groundwater?
- Do you think there are pollutants contaminating groundwater in your neighbourhood? If yes, what are the sources of the pollutants?
- What could be the effects of contaminated groundwater?
- Can we clean up groundwater easily once it is contaminated? Why?
Learning from the community
Since we lived in a drought-prone area, we had all experienced water scarcity in very personal and immediate ways. Investigating local water sources, their usage and conservation was a natural extension to what we had discussed in the classroom.
As a first task, each student maintained a personal log of their water consumption (see Activity Sheet I). They recorded how much water they had used for different purposes over a day, and compared their consumption with their classmates.
This made them more aware of how they used (or wasted!) water, and ways in which they could conserve it. Next, we did a basic ‘water survey’ in the school (see Box 2).
Box 2. Surveying water usage
The first essential step in managing water resources effectively is to understand how we use water. Researching and analyzing information about how water is used can help students become more aware of the importance of water conservation.
In addition to looking at personal water usage, students can gather information about water usage at the community level. Here are some activities that students can do, with some adult assistance, in their school and neighbourhoods:
School water survey
Students can investigate water usage in the school in different ways:
- Students could work in small groups to investigate different aspects of water usage like supply, storage, and conservation. They can do this by exploring water facilities like storage tanks, rainwater harvesting systems, and water meters around the school, and interviewing relevant staff members.
They can then share their findings with the whole class.
- Alternatively, you could invite staff who manage the school water supply to the classroom for an interaction with students about water supply, use, and storage.
Students can find answers to questions like:
- What are the different purposes for which water is used in school?
- How much water is used in the school every day?
- What is the source of the water? Are there different sources?
- Is water purified before it is used? If yes, what are the ways in which it is purified?
- Where is water stored? How much water can be stored in school?
- Are any water conservation methods used in school? What are they?
- Can we think of other ways of conserving water in school?
Neighbourhood water survey
Students can conduct a local water survey to understand how water is supplied, used, and conserved in their own neighbourhoods. Depending on their context, their neighbourhood may be a village, a few streets in a town, or an apartment complex in a city.
They can do this by exploring water facilities (like wells, borewells, storage tanks, water treatment systems, rainwater harvesting systems, etc.) and interviewing adults.
They could share their findings with the whole class by making a chart or a presentation.
Students can find answers to questions like:
- What are the different ways that water is used in your village/ neighbourhood? List them.
- Where do you get the water in the house from (a tap, a village well etc.)?
- Do you have different water sources for different purposes e.g., drinking water, water for use in the home, water for use in the garden/farm etc.? List them.
- If water comes in a pipe or a tanker, do you know where the water originates from (from groundwater, a river, a tank, etc.)?
- Do you have to pay for water? Who do you pay? How much does it cost?
- Are there storage tanks in your neighbourhood? If yes, how much water can they store? How often are they filled? Who is in charge of managing them?
- Do you treat or purify water at home before it is used? If yes, how is it treated?
- Is the water treated or purified before it reaches your home? Who purifies it?
- Are any water conservation methods used? What are they?
- Can you think of other ways of conserving water in your neighbourhood?
- Talk to some elders and find out how water availability and usage have changed in the neighbourhood over the past few decades.
We investigated where the school’s water supply came from, where it was stored, and how much was used every day. Students were fascinated by a new rain water harvesting system that was being built in the school.
This provided a great opportunity to discuss different ways of collecting and storing rainwater in the community.
The idea of doing a ‘water survey’ was extended to their communities.
The students, who came from several different villages, worked in groups and created ‘water maps’ showing water sources like borewells, surface wells, percolation tanks, and streams in their villages.
They recorded water storage and distribution facilities like the village overhead tanks and community water taps (see Fig. 2). They also interviewed their grandparents and village elders to find out how the sources and usage of water had changed over time.
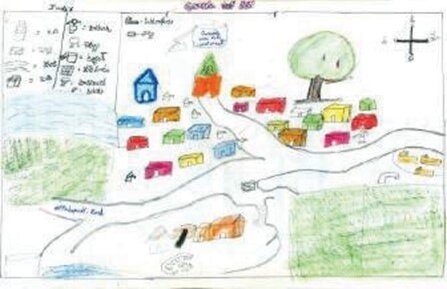
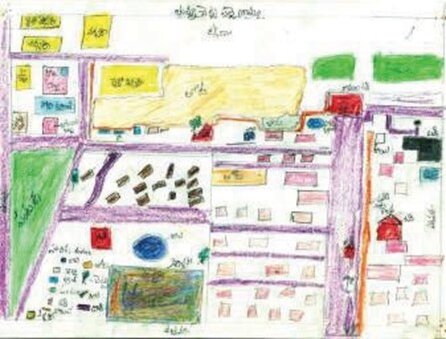
Fig. 2. Examples of children’s village water maps.
Credits: Kavita Krishna. License: CC-BY-NC
Back in the classroom, students were invited to share their findings. Many students were surprised to discover that there were no borewells when their grandparents were young.
They learnt about local streams and ponds that had dried up. They heard about ways in which water was managed and shared as a community resource by earlier generations, and were able to contrast this with the current private ownership of borewells in their villages.
Through conversations with their elders, they learnt of how the cultivation of water- intensive crops like paddy had replaced once-popular rain-fed grains like millets.
This led to a deeper discussion of the many ways in which the advent of borewells had changed farming practices, and how water scarcity was affecting farming and livelihoods in their own villages.
The discussion about changing water use patterns, water distribution, and water scarcity in their villages extended to a discussion about similar issues across the country and the world.
For example, we used maps to locate sources of freshwater in India, discussed why it was becoming scarce, and considered ways in which it could be conserved and managed.
From learning to action
While water usage was being studied in the classroom, we began to look for more ways to conserve water on the school campus. Creating a kitchen garden to reuse the relatively clean water from washing or bathing (called greywater) appealed to the class.
After scouting around the school for accessible sources of greywater, we decided to reuse the waste water from washing hands and vessels in the dining hall. A plastic pipe was laid to redirect this greywater to a small plot nearby.
Students and teachers spent several evenings clearing the plot, preparing the soil, and digging channels to distribute the water (see Fig. 3).
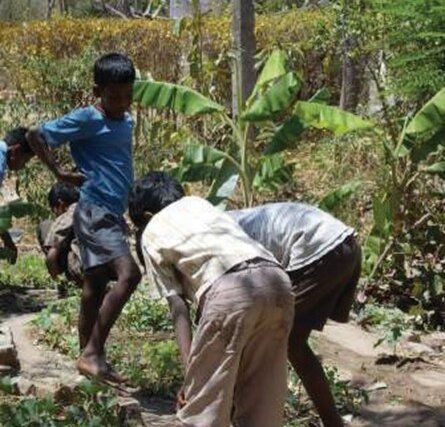
Fig. 3. Rural school kitchen garden
Credits: Kavita Krishna. License: CC-BY-NC.
Students formed small groups, each of which took responsibility for individual vegetable beds. They decided what to grow in their beds, brought seeds from home, planted the seeds, and tended their beds with enthusiasm.
After every meal, they would run to check that ‘their’ plants got water. After a few initial arguments, they negotiated ways to ‘share’ the greywater fairly using a system of ingenious ‘dams’ and channels that they constructed.
The kitchen garden became the site for many lively discussions about water, soil, plants, and agricultural practices. Students asked questions, shared their observations and knowledge.
For example, a student wondered whether the roasted dhania (coriander) seeds he had brought from home would sprout. This led to a discussion about seeds, and how they grow. Some students wanted to spray their plants with pesticides, while others objected and preferred to ‘share’ the fruits of their labour with insects and birds.
Each encounter in the garden was an opportunity to explore and learn new ideas from each other.
While my students were thrilled to harvest vegetables, and contribute them to the school kitchen for their midday meal; I was pleased to see them developing greater initiative, responsibility, and cooperation.
It was satisfying to see a child who struggled with reading in the classroom take the lead in the garden, or to listen to a timid child talk confidently about agriculture. The project provided a space for these children to develop skills and interests that were not possible inside a classroom.
Benefits of this approach
Using a teaching approach that integrated different types of activities kept students enthusiastic and motivated. It offered them the opportunity to develop different skills, and to learn in a variety of ways. For example, some of them enjoyed reading texts related to these activities, while others contributed through their skill at model making.
Some took the lead in gardening, while others contributed actively to classroom discussions. Thus, the diversity of activities made for a more inclusive learning environment.
Using the local community and context as a resource helped enrich learning in innumerable ways. Rural students were able to recognize and value connections between their own experiences, school science, and larger environmental issues.
Learning science in this way allowed them to go beyond textbook-mandated knowledge and to systematically explore the local environment. Children learned about indigenous water-management practices from village elders, and were able to link this to contemporary issues. Their enthusiasm to go beyond the curriculum, and to take action to conserve water was an unexpected benefit.
The outcomes of this unit went beyond the ‘marks’ that the mandatory ‘unit test’ revealed about student learning. Students continued to engage with the ideas they had explored in class in practical and tangible ways. They were more mindful of their water usage in school, and could often be seen chiding younger children for ‘wasting’ water.
The school kitchen garden continued to be the site of enthusiastic activity and discussions. Subsequently, students and other teachers went on to establish additional small garden plots at other wastewater outlets around the school.
Challenges and suggestions
Teaching a topic that included many activities, designed for inside and outside the classroom, presented several challenges. It took time to plan the curriculum, gather resources, and organize activities (see Box 3).
Box 3. Some additional resources for teaching and learning about water:
- An offshoot of the India water portal with ideas for students and teachers: https://www.indiawaterportal.org/topics/schools
- A wealth of teaching resources about water from the US Geological Survey: https://www.usgs.gov/special-topic/water-science-school/science/teachers-resources-water-education?qt-science_center_objects=0#qt-science_center_ objects
- A collection of simple, low-cost activities related to water: https://www.arvindguptatoys.com/air-and-water.php
Using an approach that encouraged students to explore each of these ideas took more time compared to that needed for a purely textbook-based one. Some prior planning, and the support of colleagues and students played a key role in making this experiential approach possible.
I was fortunate to teach in a school that was able and willing to give teachers and students the time and opportunity to explore this approach. In schools where it’s not possible to spare the time or the resources to try such an approach, other simpler ways could be used to connect interesting and locally relevant activities with the classroom teaching of science.
For example, activities linked to the topics being studied in class can be given to students to explore as part of their homework. Science clubs or science fairs in schools could be used as opportunities to initiate projects which explore these topics in deeper, and more multifaceted ways. The benefits of such an approach are well-worth the effort.
Key takeaways
- The study of basic science concepts, natural phenomena, and environmental issues can be integrated in the theme of ‘water’ in middle school.
- Using the local context as a resource for learning enables children to see connections between their own experiences, science, and environmental issues.
- Including diverse activities in the local environment offers children the opportunity for enthusiastic and motivated engagement in practical action.
Acknowledgements: This article is based on the learning units developed as part of ‘Exploring Science’, an activity-based science curriculum, at the Rishi Valley Education Centre. The author would like to thank the students and teachers of the Rishi Valley Rural Education Centre middle school where this unit was developed and used. The material can be accessed at https://www.rishivalley.org/exploring-science-overview.
Reference:
1. NCERT (2006), ‘Syllabus for classes at the elementary Level — Volume 1’, New Delhi.
About the Author
Kavita Krishna is an engineer with over 15 years of experience in teaching, curriculum development, and teacher education in rural and urban schools.
She can be reached at kavitak2006@gmail.com