Why, how and to what extent should teachers introduce symmetry at the primary level
Preethi, in At Right Angles magazine, explains the importance of teaching symmetry for children to develop reasoning power and creativity among other valued skills.
“What do Bach’s compositions, Rubik’s cube, the way we choose our mates, and the physics of subatomic particles have in common? All are governed by the laws of symmetry which elegantly unify scientific and artistic principles”– Mario Livio.
Introduction
In the first drawings of a child, we often see flowers, butterflies, leaves and so on. Have you noticed that they have intuitively replicated the symmetry distributed everywhere in nature?
Let us understand the basics of symmetry first. What is symmetry? How does a young child perceive it? Here is a definition of symmetry from the Merriam Webster’s dictionary – Symmetry is the property of correspondence in size, shape and relative position of parts on opposite side of a dividing line or median plane or about a center or axis.
Mathematically speaking we say an object is symmetric if it is invariant with respect to a transformation. More specifically, it means that after you transform the object it looks exactly the same as its original version.
Types of symmetry
- Reflective symmetry – A 2D object has reflective symmetry if there is a line going through it which divides it into two pieces that are mirror images of each other
- Rotational symmetry – A 2D object has rotational symmetry if the object can be rotated about a fixed point by a certain angle resulting in no apparent change
- Translational symmetry – when a 2D or 3D object can be translated (moving every point of the object by the same distance and in the same direction) resulting in no apparent change.
- Other symmetries include glide reflection symmetry (a reflection followed by a translation) and retroflection symmetry (combination of a rotation and a reflection – a special type can be helical symmetry) and scale symmetry (where enlarging or shrinking does not change an object, for example, in the case of fractals).
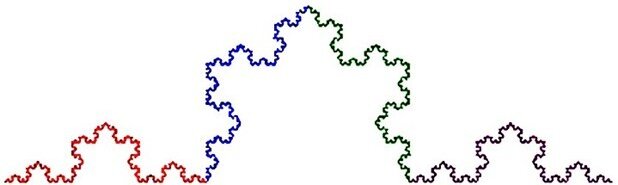
When zoomed, the red portion (or the blue, or the green, or the purple) is identical to the whole.
Concept of symmetries in textbooks
Primary level textbooks include only the first three types of symmetries in the form of various activities and worksheets. In the Grade 2 NCERT textbook there are worksheets on visual recognition of patterns and symmetry (non- verbal reasoning).
Though the patterns are nothing but the transformations or a movement of figures in a plane classified as translation (slide), a reflection (flip) and a rotation (turn), yet can we say that it is the introduction of symmetry in this textbook?
In the Grade 3 NCERT textbook, the very first chapter discusses concepts of symmetry using a story ‘Tit for Tat’ and follows it up with activities like completing mirror halves with the introduction of line of symmetry (or dotted line) by using figures and alphabets.
Similarly, pattern activities given in Chapter 10 use ingrained concept of symmetry implicitly.
Symmetry is used in Grade 4 – specifically in Chapter 9 with activities on completing the other half and implicitly in Chapter 10 with the activity on floor design and tiling patterns.
Line of symmetry is discussed for more complex figures and complex mirror game activities in Grade 5, Chapter 5.
These activities strengthen the idea of line symmetry as well as rotational symmetry (by rotating the objects using half, one-third, quarter or one-sixth turns).
Chapter 7 directly links rotational symmetry and patterns with ‘turns and pattern’ activities.
Now – why, how and to what extent should we introduce symmetry at the primary level? Some of the answers to the why are:
- To develop the ability of identifying geometrical patterns in objects around them.
- To develop problem solving skills.
- To develop the reasoning power of children.
- To develop imagination, creativity and a sense of aesthetics in children.
How and to what extent: An indirect approach is used in the primary textbooks. The concept of symmetry is utilised for different patterns in activities such as rangoli, brick tiling and weaving patterns, mirror halves, paper folding and in number patterns.
At this stage, we also need children to explore the symmetry around them in nature. This is consistent with the approach that mathematics is playing with numbers and shapes, their relations to each other, and the rules of the game.
The activities used for this purpose are illustrated in the rest of the article.
Target Audience
These activities were conducted with four students of Class 5 of GPS Danda Malla, Block Ekeshwar. They came from underprivileged background with no academic support at home. They had the usual curiosity to learn new things.
Identification of the problem
While teaching Chapter 4 and Chapter 9 of the Grade 5 textbook, we came across a page (Figure 1) where an instruction has been given to the teachers to apply symmetry and to find out the area of different shapes in grid paper.
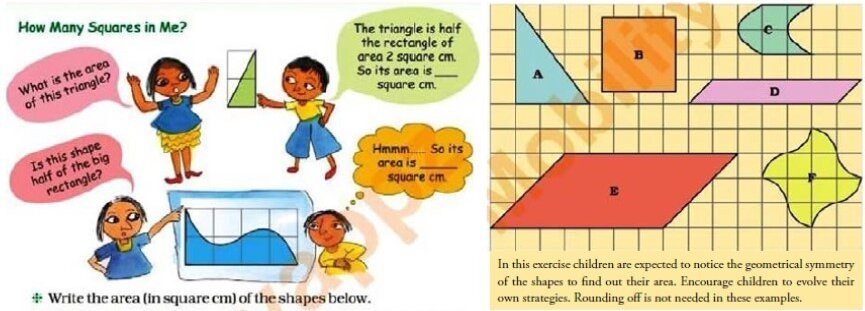
Figure 1
What the teacher wanted to do and why
We realised that although the students were introduced to ‘symmetry’ through various activities in the Class 3, 4 and 5 textbooks, they could not use it for these area related problems. So, I tried to help them link the concept of symmetry with the concept of area, specifically in the context of the given problem.
Work Plan: I made a series of worksheets for the following:
- Pretest to identify the previous knowledge of students
- Understanding the various symmetries such as rotational symmetry, translation symmetry, mirror reflection, line of symmetry and curve of symmetry1
- Finding the areas of different shapes on grid paper using symmetry
- Evaluating students’ understanding of these concepts.
Day 1: Previous Knowledge of Students
Result: I came to the conclusion that:
- Students had implicit understanding of symmetry in form of recognising pattern, reflection and completing the other half.
- They were able to get the area of a simple square and rectangle by counting the unit square.
- They had no knowledge of line of symmetry.
- They could not relate symmetry with the concept of area.
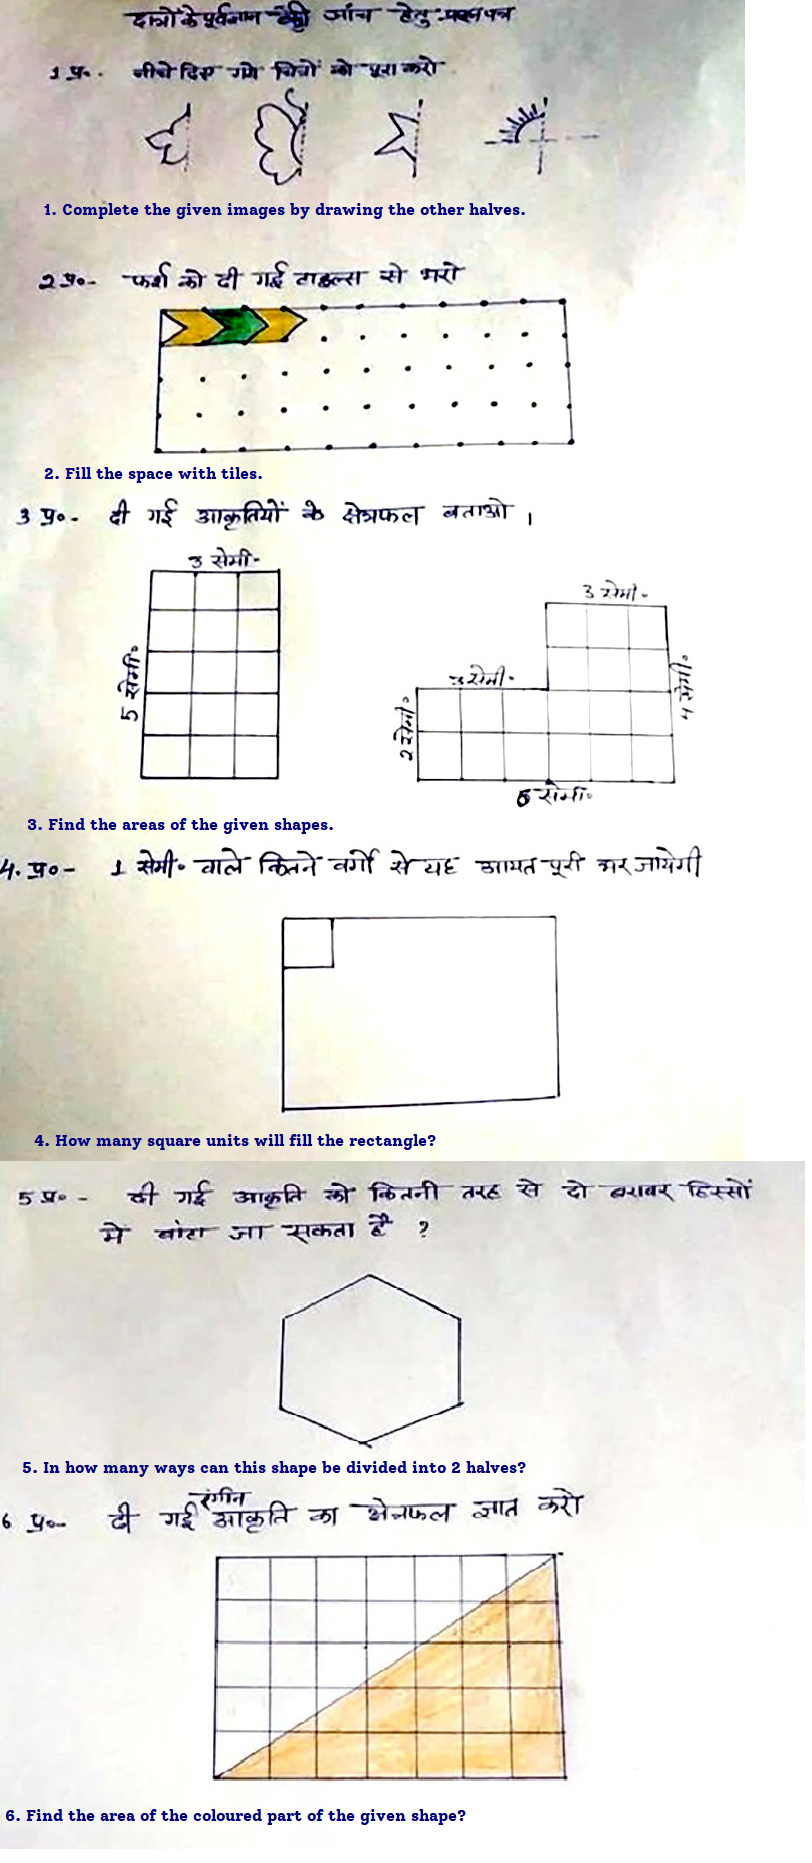
Figure 3: Pretest
Day 2: Conducting the Work Plan
Activity 1: Lines of symmetry: With this worksheet, I provided students with paper cutouts of the relevant shapes. Children worked with the shapes, identified the lines of symmetry, and filled the worksheet easily. They could identify the line of symmetry in other shapes as well.
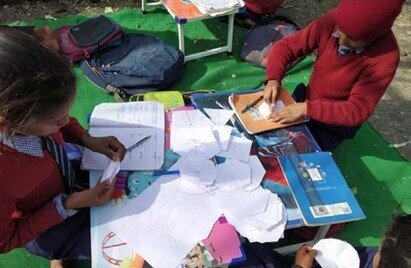
Figure 4: Activity 1
Activity 2: Rotational symmetry: I demonstrated with one shape and the children got the idea
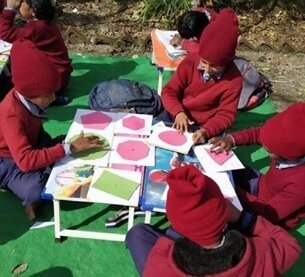
Figure 5: Activity 2
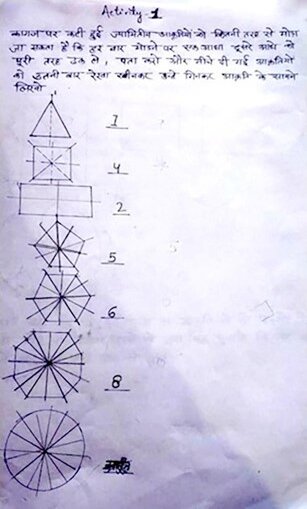
Figure 6: Activity 1
In how many ways the given shapes can be folded so that the folded halves overlap each other exactly? Draw these fold-lines for each given shape and write the number of fold-lines.
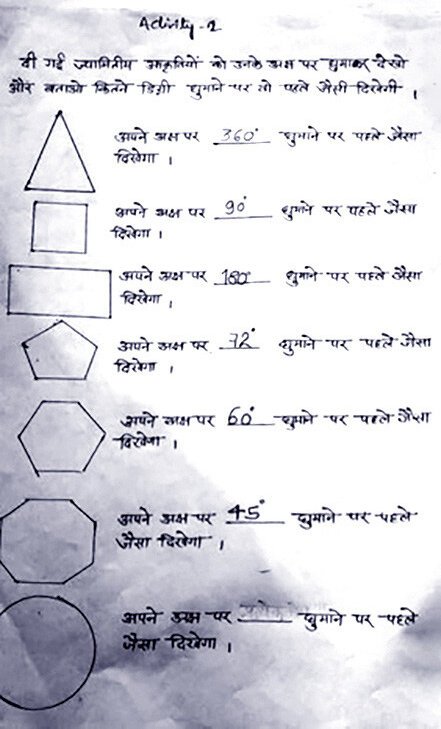
Figure 7: Activity 2
Rotate each shape by an angle so that the rotated shape looks as if it hasn’t been rotated. Write the angle in the blank next to each shape.
Activity 3: Finding halves using rotational symmetry: This dealt with shapes halved by a straight or curved line in such a way that there is rotational symmetry (half turn) but not line symmetry. Children had to understand how to use rotational symmetry to determine if two parts of a given shape were identical.
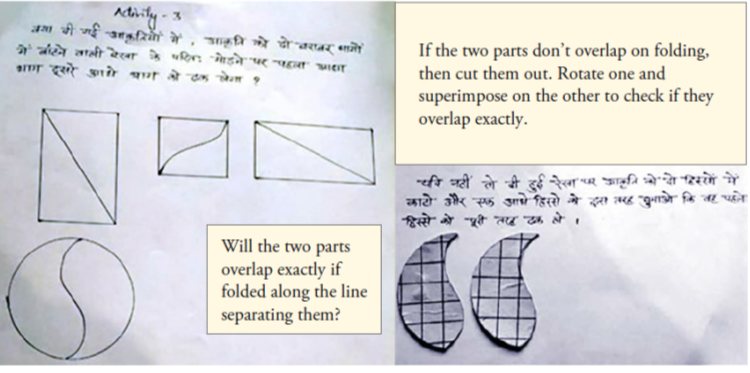
Figure 8: Activity 3
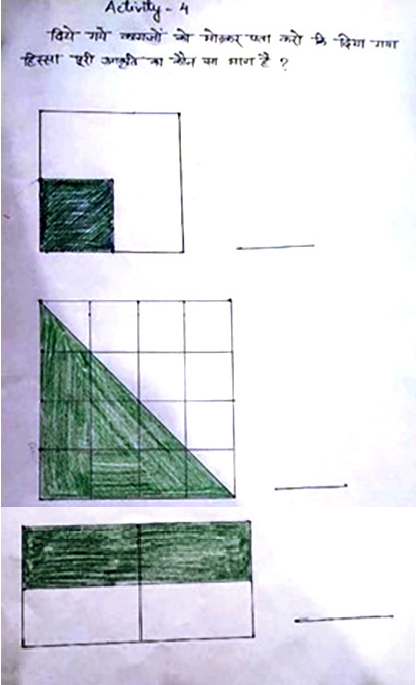
Figure 9: Activity 4
Find out what part of each shape is coloured by folding
Activity 5: Tile with a given shape: This gave children an exposure to translational symmetry mostly used in tiling (and therefore easily seen on floors) and textile prints.
A stencil was provided for the children to outline and tile the shapes on squared paper.
In the next part we demonstrate how this symmetry can be used to find areas of certain shapes as we move the given shapes forward, form a pattern and colour each part with a different colour.
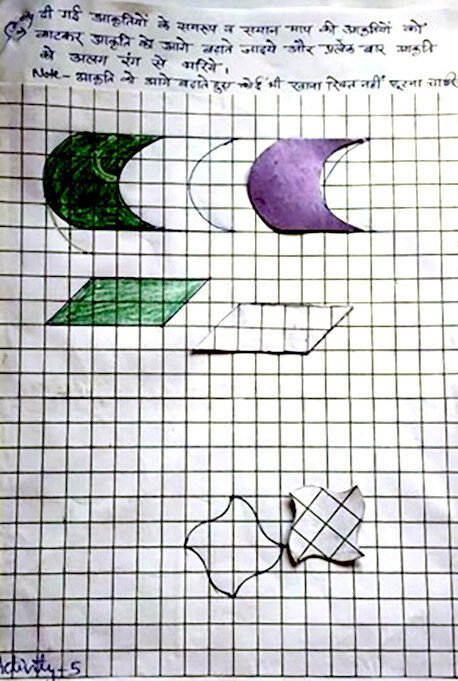
Figure 10: Activity 5
Tile with the given shape. Colour adjacent shapes differently.
Using symmetry to find the areas:
After experiencing three types of symmetry, we went to the next level. It was time to make them understand how the knowledge and understanding they had gained through these activities could help in finding the areas of shapes other than squares or rectangles.
In example 1, we identified the line of symmetry and by imagining the paper folding through that line we got two halves or a complete square (or rectangle). Now it became easy for the student to count the number of unit squares in the given square (or rectangle), and then find half or quarter of that number to get the required area (Figure 11).
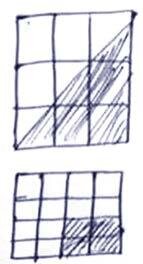
Figure 11
In example 2, we used the symmetry of the shapes which were halved by the curved line. Children understood by cutting, rotating and superimposing that the curved line divided the rectangle into two halves. So, they counted the number of unit squares in the rectangle and halved the number to get the required area (Figure 12).
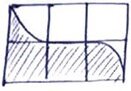
Figure 12
In example 3, we use Activity 5 to show how by translating the given shape we can get a complete square or rectangle as shown in Figure 13.

Figure 13
Evaluation
After practising such examples for 3 – 4 days, it was time for evaluation. The worksheet simply asked them to find the areas of the given shapes.
The instructions that I gave them were that they could use the activities of completing the square or rectangle or folding the shapes or cutting and rotating as they had done in class.
They were also given the option of simply visualising these operations instead of actually executing them. They had to however show their reasoning process (even with sketches), instead of just giving the answer.
Each problem had 2 marks: 1 for obtaining a correct answer and 1 for the usefulness of the procedure they used.
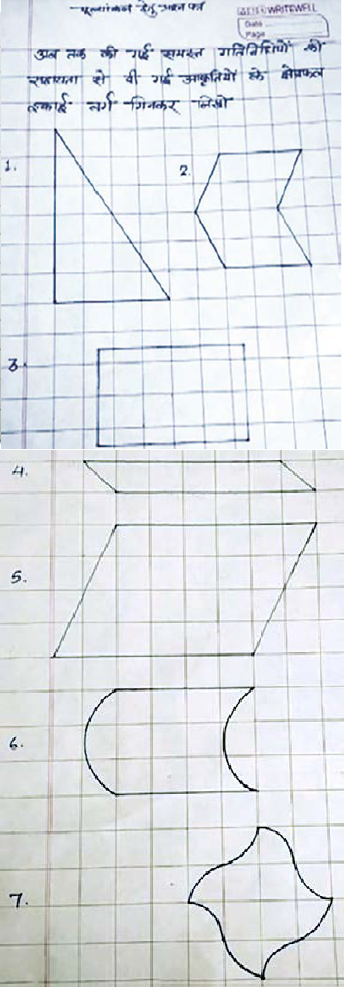
Figure 14: Evaluation
Finding
Three children were able to get the area of different shapes using symmetry.
In question 1 of the evaluation, it became obvious that students were getting the idea of making the other half to get a full square or rectangle.
But beyond this they also understood that this is not happening just by folding the shapes through the hypotenuse (let’s call it AB); here the concept of rotation was used, and they knew that by rotating the shape through the line AB by 180°, they were getting a rectangle.
Furthermore, they knew that a square or a rectangle is needed to be formed to get the area of the required shape.
In question 6, the only way to get the area of the required shape is by using the concept of translation and all but one of the students were able to get this question right.
In the rest of the figures, the children were able to use the activity of completing the square and forming a rectangle and square as well as using translational symmetry to get the area.
Conclusion
Since the whole concept and problem were completely new for the children, we cannot compare their pretest knowledge and post test results by standard means.
My observations:
- Children were excited to play with the shapes and do the activities related to symmetry and could easily solve the given worksheets.
- They still found it complicated when they had to use symmetry to find areas.
- I myself had difficulties with these and had to practise several examples with them for a few days.
Finally, it was satisfactory to some extent as a completely new experience for both children and teacher. Children were able to get the idea and use it in solving the problem without using any terminology related to symmetry.
Limitations
We chose very specific and limited number of problems and we dealt with very few shapes. Further worksheets with more shapes are needed to fully evaluate the children’s understanding in this matter.
About the author:

PREETI DHASMANA is an assistant teacher at a basic school in Pauri Garhwal, Uttarakhand. She has a teaching experience of 8 years with children from rural backgrounds. She has done a Masters course in political science, with B.Ed. and D.El.Ed. She may be contacted at preetidhasmana884@gmail.com.